|
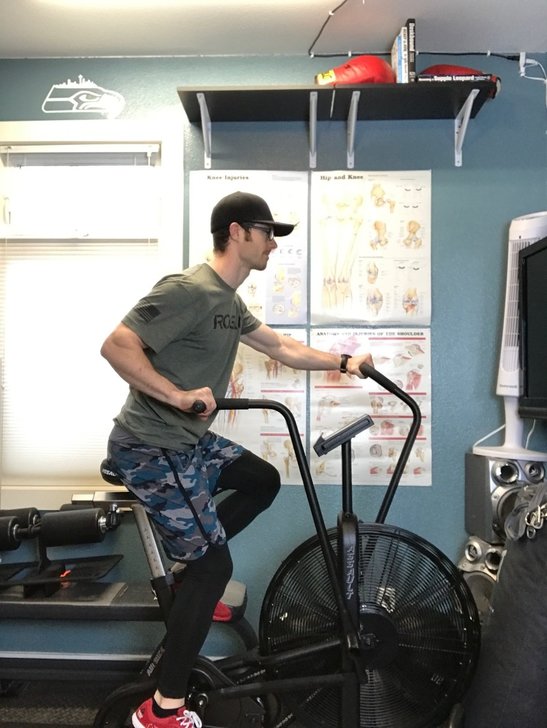
Picture this; its six o'clock in the morning and you just finished your morning workout. Today, you set your alarm clock early, just to make time to exercise before work. Using that positive momentum, you pushed yourself during your workout and completed a new personal record of pushups in a single workout. Now, as you are heading to work for the day, you feel great about what you have already accomplished for the day and excited about what’s to come. After your morning meetings, it’s already lunch time and now you have a choice. Do you choose to “treat yourself” for working hard this morning and get some fast food that you like but know isn’t the best for your health, or do you choose to stop by the grocery store or deli for some healthier food options? I know for myself, whenever I make the extra effort to wake up early for a workout or push myself physically, I want to follow that up with good food and nutrition choices. Now, what that means specifically for you can differ immensely from one person to the next, but just making the effort to make better choices can go a long way. This is just one example of how exercise can allow you to make better decisions that can then further positively impact your health. Exercise also has the added bonus that it can improve your sleep quality especially when getting into a consistent routine. I believe that there are 4 main pillars to health which include; Exercise, Nutrition, Sleep, and Social/Emotional Wellness. Of these 4 pillars, exercise is often the glue that keeps them all together and reminds us of the importance of them all.
1 Comment
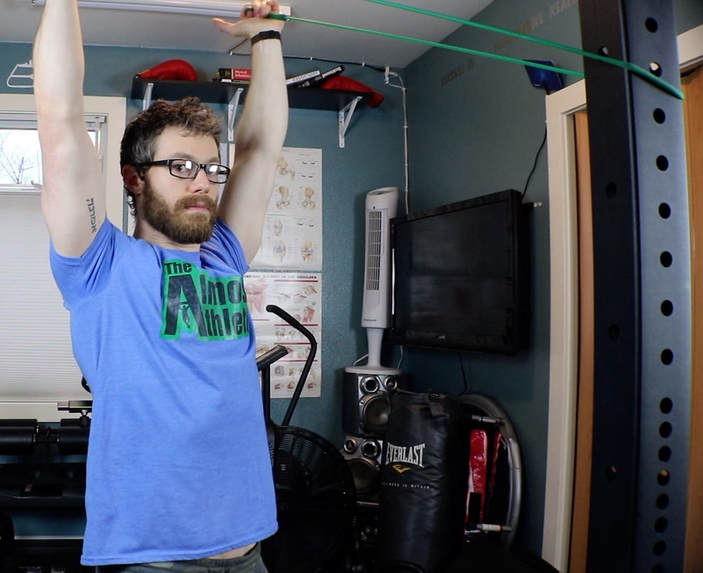
In this Interview we Discuss... -Current Approaches to Nutrition -How Lee is Prepping to hike the PCT (Pacific Crest Trail) -Packing suggestions for long hikes -Things to consider for hiking prep. and more... Learn more about Lee and is upcoming journey on his blog here! As humans we are one of the most amazing and adaptive species on the planet. We adapt so well that this adaptation can sometimes have negative consequences, for example, adaptive poor posture, rounded shoulders, hunched spine etc. But, this adaptation can also happen in the opposite direction where we can make physical improvements over time by practicing good positions and adapting to productive stresses on the body. One of the most common elements that I see and have dealt with myself is shoulder injuries. This can vary far and wide in how symptoms manifest, but are often-times a result of a few common problems. These can often be improved with a few basic exercises. Over the years I have dealt with many of my own shoulder injuries including a rotator cuff and labrum repair about 15 years ago. Ever since then, I have had to put in extra time and focus on my shoulder to continue to allow for proper function mechanics. This includes mobility, stability and more but all starts with my go to shoulder warm up. I complete this before participating in any exercise or challenging life tasks. * Remember to always consult with your physician or physical therapist in regards to starting or changing your exercise routine and in no means is this information meant to diagnose or treat your injury. For full legal disclaimer, see About Me page. First start with good posture. (Click here to find out what good posture means if you are not sure.) With all the exercises that I will be sharing this is how to start the movement from this optimal posture position. 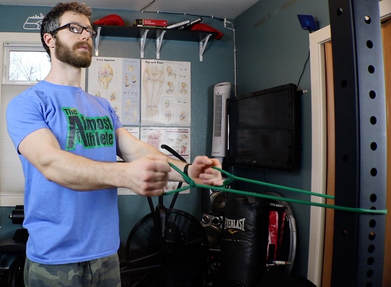 Standing Rows Starting Position Standing Rows Starting Position #1) Standing Rows Purpose This is a great exercise to help promote postural awareness as well as warm up your muscles including your rhomboids, middle traps, lower traps, deltoids, biceps and others. 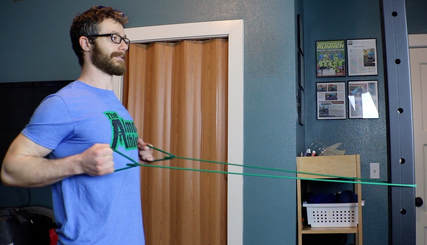 Standing Rows Mid Point Position Standing Rows Mid Point Position How To Start by standing up tall with good posture. Wrap your resistance band around a post or or securing it in a door. Pull the band back with your arms by your side between your hips and your armpit by squeezing your shoulder blades together then slowly release your arms forward until your elbows are straight. Repeat this 10 times 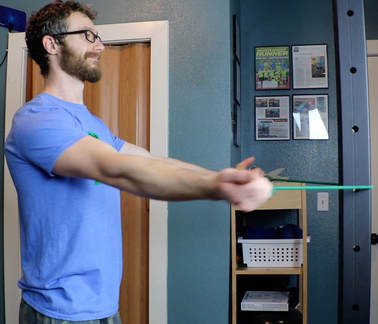 Shoulder Extensions Starting Position Shoulder Extensions Starting Position #2) Shoulder Extensions Purpose This exercise is important for continuing to warm up the muscles that surround the shoulder joint as well as to practice some mobility within the shoulder joint in a plane of motion that we often times neglect to utilize. When this becomes limited, this can lead to many shoulder problems including problems with the bicep tendon and rotator cuff muscles to name a few. 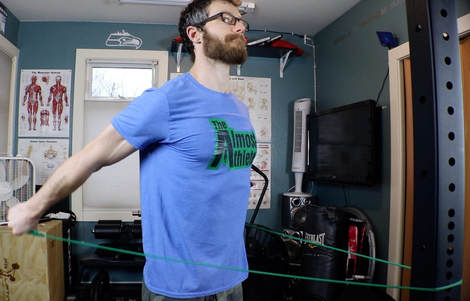 Shoulder Extensions Mid Point Position Shoulder Extensions Mid Point Position How To Again starting with good posture and the same resistance band. Straighten your arms so your elbows are extended and your hands are by your sides. Now pull your shoulder blades together and bring your arms behind you as far as you comfortably can, while trying to keep your shoulders down and back. Once you cannot go any further, slowly return of your starting position while maintaining the shoulder blade squeezed together as well as good posture throughout. Repeat this 10 times 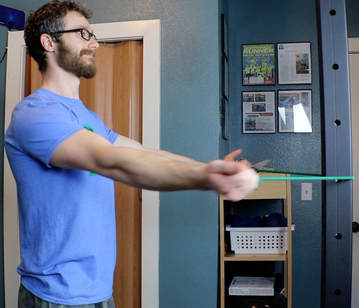 Standing T's (Horizontal Abduction) Starting Position Standing T's (Horizontal Abduction) Starting Position #3) Standing T’s (Shoulder Horizontal Abduction) Purpose Standing T’s help to activate and increase awareness of your shoulder stabilizers including your rotator cuff as well as your postural support muscles. Muscles being used include; infraspinatus, teres minor, mid traps, rhomboids, lower traps, posterior deltoid and others. This can also help to undo some of the excessive forward postures that we tend to adapt to during the work day. And finally, this can provide improved kinesthetic awareness of where your body is at in time and space which helps with posture. 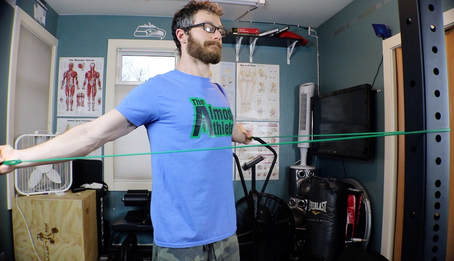 Standing T's (Horizontal Abduction) Mid Point Position Standing T's (Horizontal Abduction) Mid Point Position How To Start by finding your good posture position with your core engaged. Next, raise both of your arms out in front of you with your elbows straight, then bring both arms out to your sides then back behind you, focusing on pinching your shoulder blades together to make this movement happen. Now, bring your arms out in front of you again. Repeat this 10 times. 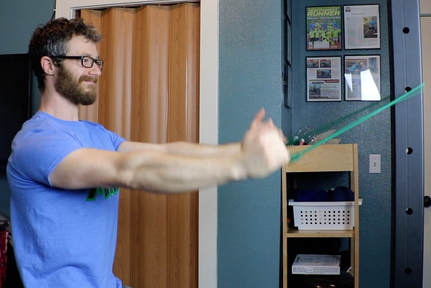 Standing Y's (Shoulder Flexion) Starting Position Standing Y's (Shoulder Flexion) Starting Position #4) Standing Y’s (Shoulder Flexion) Purpose Standing Y’s help to activate and increase awareness of your shoulder stabilizers including your rotator cuff as well as your postural support muscles. Muscles being used include; infraspinatus, teres minor, mid traps, rhomboids, lower traps, posterior deltoid and others. This can also help to undo some of the excessive forward postures that we tend to adapt to during the work day. And finally, this can provide improved kinesthetic awareness of where your body is at in time and space which helps with posture. 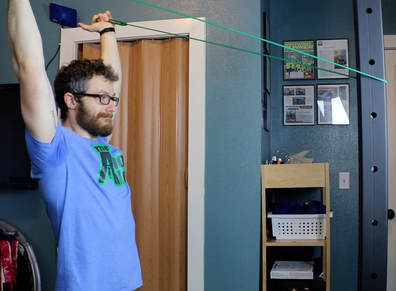 Standing Y's (Shoulder Flexion) Mid Point Position Standing Y's (Shoulder Flexion) Mid Point Position How To Start by finding your good posture position with your core engaged. Next, raise both of your arms out in front of you with your elbows straight and thumbs up, then bring both arms up towards your head, trying to get your arms just outside of your ears, focusing on bring your shoulder blades together and down to make this movement happen. Now, bring your arms back down in front of you again. This should look similar to the “touchdown” sign the referee's signal in football. Repeat this 10 times. 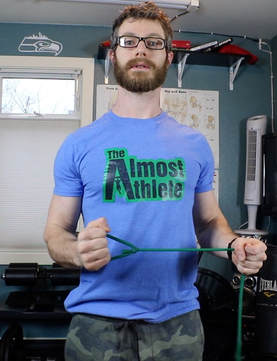 Shoulder External Rotation Starting Position Shoulder External Rotation Starting Position #5) Shoulder External Rotation Purpose This exercise specifically works on warming up your shoulders, deltoids and the rotator cuff muscles as well as continued postural awareness. 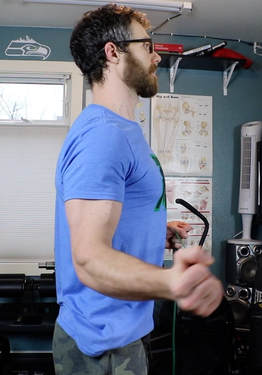 Shoulder External Rotation Mid Point Position Shoulder External Rotation Mid Point Position How To Starting with good posture. Again you’re going to grab the band in front of you with your left hand holding about halfway down the resistance band. With your right hand on one of the handles and maintaining good posture. With your elbow close to your side, you’re going to rotate your arm and externally (towards your right, away from your body). Once you have rotated us as far as you can comfortably without compromising your good posture, then slowly bring it back to your starting position. Repeat this 10 times. *Note some people have excessive shoulder range of motion and can rotate much further than necessary. If this is you, only rotate to about 45 to 75° and focus on maintaining good positioning. 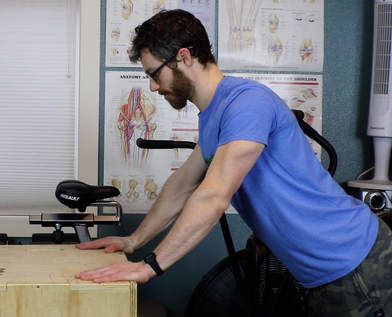 Shoulder Blade Push Ups Stating Position Shoulder Blade Push Ups Stating Position #6) Shoulder blade push-ups at a desk or wall Purpose Shoulder Blade Push-Ups help to activate and increase awareness of your shoulder and scapular stabilizing muscles including your serratus anterior. These muscles tend to become under-developed and often times shut down on many of us and this problem becomes worse with poor posture. These muscles help to keep your shoulder blade in the proper position and assist with shoulder movements especially when lifting or reaching with our arms. Finally, this can provide improved kinesthetic awareness of where your body is at in time and space which helps with posture. 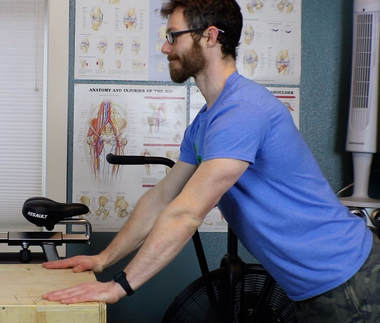 Shoulder Blade Push Ups Mid Way Position Shoulder Blade Push Ups Mid Way Position How To Start by finding your good posture position with your core engaged. Next, finding a clear spot on a wall or desk, and place your hands there about your shoulder width apart and just below shoulder height. Now, keep your elbows straight, pinch your shoulder blades together to bring your body slightly closer to the wall, then, spread your shoulder blades apart to push your body slightly farther away from the wall. You should be focusing on pinching your shoulder blades together then spreading them apart to make this movement happen. Remember this is a small movement where you don’t want to bend your elbows or round your back at all throughout this movement. Repeat this 10 times. Conclusion Although shoulder injuries, aches and pains are all too common, many can be improved or mitigated with some simple and consistent effort towards improving postural awareness as well as joint stability and mobility. And, although this is not a exhaustive list of all important shoulder exercises, this warm-up series has been a big help for me to maintain and improve with function of my shoulders. Throughout my life I have been fortunate to have many fun adventures including; sports, hiking, weightlifting and more. As good as these experiences have been, a few have left me with long lasting aches including some low back pain. For me, this usually manifests itself as tightness and stiffness in the morning or after a lot of repetitive tasks like bending over or twisting. When I notice this discomfort creeping in, I have 3 quick stretches that I do to alleviate the pain. The best part about these is that they can be done almost anywhere and can make a pretty drastic difference that also improves over time. I think of them as my first approach when experiencing any back pain. Note: now none of these stretches should be painful while doing them so either be gentler or check with a PT or trainer to ensure proper form. * Remember to always consult with your physician or physical therapist in regards to starting or changing your exercise routine and in no means is this information meant to diagnose or treat your injury. For full legal disclaimer, see About Me page. 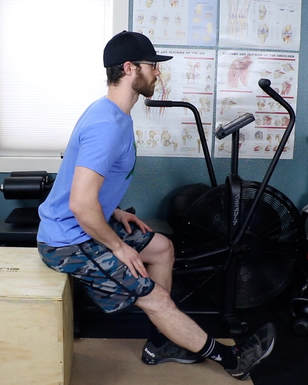 Seated Hamstring Stretch Seated Hamstring Stretch #1 Seated Hamstring Stretch Even though the name highlights the hamstring muscle group (a group of large muscles on the back of your thigh including the biceps femoris, semitendinosus and semimembranosus). The stretch will also include more than just your hamstrings and could involve everything from the bottom of your foot up to your pelvis and maybe even your lower back muscles themselves, depending on your anatomy and mobility. How-To Seated Hamstring Stretch Start by sitting with good posture (read this for posture specifics). Scoot towards the edge of the chair or bench (not a chair with wheels for a squishy surface like a bed or a couch), keep one leg with your foot firmly on the floor with the other leg extended out in front of you and your knee straight with your toes toward the ceiling. Lean forward by tilting at your pelvis and not rounding your back or shoulders, slowly hinge forward until a light stretches is felt. Hold this for 30 seconds or longer and then switch legs and repeat. Why This Stretch? Often times, and certainly in my case, one of the underlying issues of low back pain is tight hamstring muscles. To fully understand this and what the entire picture looks like, I try to think of this muscle tightness in the scheme of the larger picture. Usually when muscles are tight it is for a reason. My reason like others is a combination of weak core muscles compared to my hip muscles and too much practice of poor position i.e. postural compensation. I will oftentimes catch myself standing with my core completely relaxed and my hips rolled forward (anterior pelvic tilt with lumbar hyperextension). This position for me is a lazy posture and causes increased pressure on my lower back and leads to aches and pains. Because my hamstrings attach to my pelvis and my pelvis is often times tilted forward, this places the hamstrings under tension constantly to help stabilize my pelvis and the rest of my frame, instead of the core muscles that are supposed to do this stabilization job. 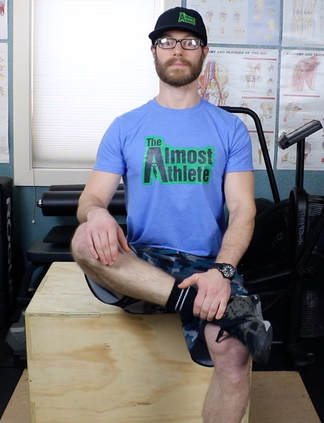 Seated Hip Rotation Stretch #1 Seated Hip Rotation Stretch #1 #2 Seated Hip Rotation Stretch (Two Parts) One of the main jobs of the hip joint is too rotate. This seems simple enough, but unfortunately our daily living doesn’t require a lot of full hip range of motion. We then stop using it and begin to lose the ability to rotate the hip. This large group of my hip muscles can become tight and obnoxious on me and start to bother my low back especially when I haven’t done some hip rotation for more than a day or so. This is another one of my go to stretches for both hip and low back’s issues and to work on hip rotation. 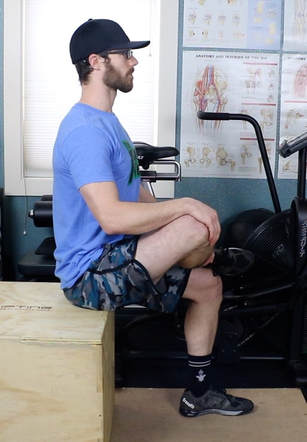 Seated Hip Rotation Stretch #1 Side View Seated Hip Rotation Stretch #1 Side View How-To Seated Hip Rotation Stretch (Two Parts) Start again by sitting up with good posture and sit towards the edge of the chair or bench (again not a chair with wheels or a squishy surface like a bed or couch). Keep one leg with your foot on the floor and raise your other leg crossing over your knee so that your ankle is in line with you or knee. Let your bent leg relax while you keep your legs in this position with help from your arms if needed and continuing to focus on maintaining good posture. Hold this position for 30 seconds then before removing your bent leg, reach down and grab the side of your leg that is bent and gently pull your leg towards your chest until a comfortable stretch is felt (pictured below). Hold this for 30 seconds then repeat both of the stretches on your other leg. 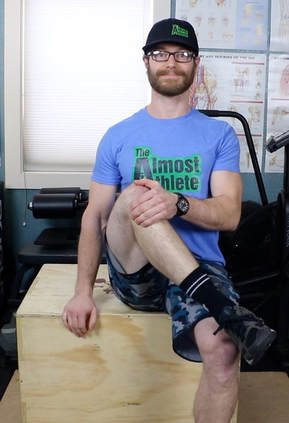 Seated Hip Rotation Stretch #2 Seated Hip Rotation Stretch #2 Why This Stretch? These hip rotator muscles can be a common problem with symptoms of sciatic nerve pain, SI joint pain, as well as low back and other knee problems. Whether these muscles are tight, inflamed, weak or just irritated, allowing the muscles to go through their available range of motion and improving the mobility can help to improve his symptoms along with other specific mobility or strength training. 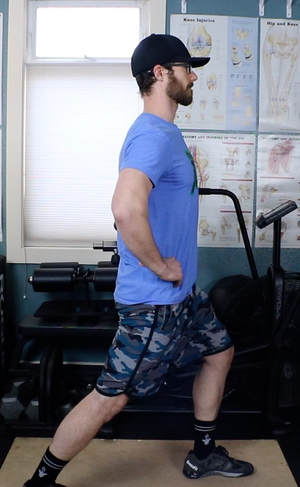 Standing Hip Flexor Stretch (profile view) Standing Hip Flexor Stretch (profile view) #3 Standing Hip Flexor Stretch The hip flexor group of muscles is on the front side of your body and flexes your hip joint (brings your knee towards your chest and chest towards your knee) and helps to stabilize your spine. Although the hip flexor muscles includes multiple different structures, we will focus on three main muscles in this area including the Iliacus, Psoas Major and the Rectus Femoris. The Iliacus and Psoas Major (and Psoas Minor) are often grouped together and referred to you as simply the “Psoas”. The Rectus Femoris is also one of your quadriceps muscles but is the only one that’s involved in hip flexion. This stretch is primarily focusing on the Psoas muscles but may include others. How-To Standing Hip Flexor Stretch Start by standing up tall with good posture, with your feet about hip width apart. Stagger your stance so that one leg is in front of you and the other leg behind you. Begin to slowly shift your weight forward towards your front leg allowing the heel of your back foot to come off of the ground and bending your front knee as much as needed until a light stretch is felt. This stretch should be felt in front of the leg that’s behind you anywhere from about where the front pocket on your pants would be, deep inside your hip and possibly low back. Hold this for 30 seconds and repeat on the other side. 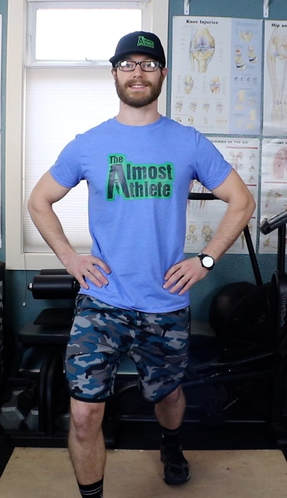 Standing Hip Flexor Stretch (front view) Standing Hip Flexor Stretch (front view) Why This Stretch? The hip flexor muscles that we are referring to often become shortened from extended periods of sitting, which places the muscles in a shortened position that our body begins to adapt to. Because these muscles (Psoas specifically) attach to your low back (lumbar vertebrae), this can put pull on your spine causing irritation and pain as well as cause your pelvis to tilt increasingly forward. By improving the mobility of these muscles we can reduce the stress on the low back and often times improve symptoms. Conclusion
Although these stretches may not be a complete fix or solution to any or all low back problems, it can be a great first approach and could be a tool that is used, along with others, including but not limited to core strengthening, postural awareness and soft tissue mobility. I try personally to do these three stretches throughout the day whenever I notice any issues in my low back or when I just get a minute and want to hedge my bets against future low back problems. If you would like to learn more about strategies for low back pain, check out my Ebook here for Back Pain Solutions! People ask me ALL THE TIME for a quick exercise routine or workout that they can do at home or while traveling without any equipment. Well here is one example that can be done anywhere and takes LESS THAN 8 Minutes!
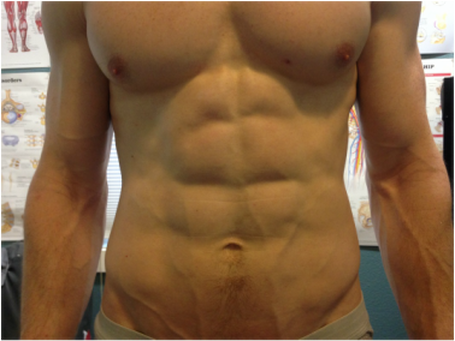
Give it a shot and let me know what you think! * Disclaimer: Remember to always consult with your physician or physical therapist in regards to starting or changing your exercise routine and in no means is this information meant to diagnose or treat your injury. For full legal disclaimer, see About Me page. Change is constant. This is what makes life so interesting and at the same time a challenge. As I am writing this, I have just had a few changes in my own life. I am adjusting my main focus for work right now from Physical Therapy to Personal Training! I see a need for skilled Personal Trainers who understand anatomy and physiology and can help people transition from physical therapy to fully functional. Whether that is going to the gym to exercise safely, sports, hiking or Crossfit, I have been helping people make that transition successfully for years. I am very excited about this new focus, as this will allow for more opportunities to help people in my local community of West Seattle. It will also give me more time for writing, and therefore helping more people beyond my immediate community. As the saying goes, "When one door closes, another opens." -Alexander Graham Bell Therefore, I am letting you in on this “Open Door” opportunity to train with me! I have just opened up a few time slots during the week for Personal Training in West Seattle. Please contact me here if you are interested, as there are a limited number of training sessions available. Also, you can read more about my experience and approach to Personal Training here. I am really excited and looking forward to this next chapter of my life and SUPER EXCITED to help YOU with your goals! I hope to hear from you soon! Jordan Proudfoot ACE Certified Personal Trainer, Physical Therapist Assistant, FMS, Crossfit L1 Trainer Contact Me The first question you need to ask yourself is, why are you exercising? Why are you going to the gym or the garage, or the living room. Why are you going through the effort and forcing your body through uncomfortable workouts? I believe that most people would answer this question with something that has to do with the desire for change and improvement. Whether that is losing weight, gaining muscle, strength, endurance, flexibility, sport or any other reason, the desire to improve is universal. To challenge your body with something that is more than what it is used to, in order for a change to be made. Those changes are often times limited only by the amount of effort and consistency we are willing to put towards our goal. Now that we can see the clear purpose of exercising is to make positive changes to your body through consistent action. We can also recognize the importance of doing the correct exercises or stretches or positions in order to reach our desired outcome. If you want to build an increase in muscle and strength, you are going to have to challenge your muscles in a way that is specific for increasing strength as apposed to endurance or flexibility. That is the concept of Specificity of Training, and the idea that our bodies can adapt through training, but tends to adapt to what we practice and not what we don't. Therefore, practicing good posture and body positions during training is important, as well as practicing good posture and positions throughout your day outside of training. This will help to minimize the chance of adapting to poor positions and posture and will help to reduce or avoid injuries. When it comes to exercises, training ,weight lifting, sports, etc, I BELIEVE THE NUMBER ONE THING WE CAN DO TO MINIMIZE AND AVOID INJURIES IS TO WARM-UP PROPERLY. It seems that for most people that exercises at a gym or at home tend to either do a poor job of attempting to warm up before exercising or just skip the warm up altogether and jump right into their workout. This is thought to be a really great way to cut a few minutes off of their workout. Unfortunately this is setting them up for a poor workout and a potential injury. I believe there are 5 principles of a good warm-up routine to avoid injury and optimize your workout. 1) Start with increasing systemic blood flow which will help to increase body and tissue temperature as well as preparing your breathing for your exercise. This increase in body and tissue temperature is important for shifting blood flow away from your organs and into the working muscle tissue. This not only helps prepare for activity but allows improved tissue extensibility as well as improved oxygen supply to the muscles. This can be done with a number of different exercises including but not limited to jogging in place or around the block, jump rope, bicycle or rowing, to name a few options. 2) Increase blood flow and neuromuscular awareness to specific muscles that control your major joints including hips, shoulders, and spine. This is important for getting your body out of the patterns of daily movements and positions that are adapted during work, driving, sitting, and repetitive tasks. You want to break out of these potentially poor patterns before trying to add additional stressors or learning new movement patterns or skills. This can be done with focused controlled motions with bodyweight squats, lunges, push ups, rows, and side stepping to name a few. 3) Take your joints though their full Range of Motion (ROM). This includes shoulders, elbows, wrists, hips, knees ankles and spine. This is very important to ensure that you start each workout with access to your full ROM at each joint before adding additional stressors or movement patterns. This can be done with movements like, full depth bodyweight squats for hip, knee and ankle ROM as well as shoulder pass throughs and around the worlds with a dowel as well as leg swings to name a few. 4) Prepare movement patterns that are specific to today's workout. This is primarily focusing on the neuromuscular connection and awareness. This is how you can continue to refine a skilled movement pattern as well as prepare your body to go through specific motions and movements that you plan to challenge your body with during todays workout. This should be done with no weight to light weight depending on the movement. 5) Things to avoid during your warm-up including but not limited to, static stretches, ballistic stretches, quick agility work, aggressive plyometrics and extended cardio. Static stretches inhibit the stretch response and therefore can limit muscle reaction time and performance and are best used for muscle lengthening post exercises. Ballistic stretches, quick agility work, and aggressive plyometrics all rely on muscles being stretches far and quickly followed by a quick and strong muscle contraction. This puts excessively increased forces on your joints and even more importantly on your connective tissue. These are great exercises when done properly and once you are already warmed-up. Extended cardio training can be a great way to train for cardiovascular endurance but is not a substitute for a proper warm-up. If you choose to have extended cardio as part of your exercise routine, this shoulder ideally be done after completing your warm-up to ensure proper mechanics and to avoid injury. If fatigue is reached with extended cardio, this could be another reason to avoid this as part of your warm-up. To wrap things up, it is a good reminder to focus on your purpose for exercising in the first place. Challenge your body in specific ways in order to achieve desired changes without injury. The 5 principles of a good warm-up can help to prepare your body for a great workout while avoiding injuries. * Disclaimer: Remember to always consult with your physician or physical therapist in regards to starting or changing your exercise routine and in no means is this information meant to diagnose or treat your injury. For full legal disclaimer, see About Me page. Now I'd talk about the "core", which is another one of these over-used and under-defined terms that we hear all of the time in health, fitness and wellness. We must first make clear what it is we are actually talking about. The elusive six-pack is for most people this image that comes to mind when talking about or training for a better core. This is, unfortunately, not at all the same thing as I am referring to and most of the good science shows us, that this is NOT the core we should be focusing on. To make this idea clear, let’s refer to this idea of the core as the “inner core”. If trained and used properly, these are the muscles that help to stabilize our spine, assist with proper breathing, stabilize our pelvic bones and allow for more controlled safer movement. There are basically 4 muscle groups that make up what we refer to as the “inner core”. These are the pelvic floor muscles, transverse abdominis (TA), spinal stabilizers, and the diaphragm. As you can see, the muscles that make up our inner core create this cylinder around your abdominal cavity which houses your stomach as well as internal organs such as kidney’s, liver and intestines. If we don’t’ have good access to these muscle because of deconditioning, muscle atrophy, motor pattern problems or low back pain, we often times create this much needed abdominal stability through holding our breath and forcing air pressure against a closed airway which we call the “valsalva maneuver”. This unfortunately increases intra-abdominal pressure as well as increases heart rate and blood pressure and should be avoided during exercise routines and lifting tasks. On the flip side to this, when you start to create strength and stability in these inner core muscles, this will begin the foundation of all other positions including good posture and proper breathing techniques. So the next obvious question is, how do you train these muscles and ensure that they are being used properly? Let's start with the pelvic floor muscles, which again make up the base of our inner core. These muscles are going to stabilize our pelvic bones as well as SI (Sacral Iliac) joints. To contract these muscles, we start with the classic exercise known as a kegel. These are popular in the world of woman's health especially pre and post pregnancy. Fortunately, we all need to be aware of these muscles, male and female, and make sure that we are using them in conjunction with the other inner core muscles. A common cue that is used to contract these muscles is the sensation of holding in urination or stopping mid-stream. As silly as this sounds, it is quite effective in turning on this valuable muscle group. The next group of the inner core muscles we want to begin to train is the Transverse Abdominus (TA), which is the corset-like muscle that runs horizontally across your midsection. This muscle is involved with stabilizing our abdomen as well as compressing your abdominal contents during tasks like coughing and having a bowel movement. In order to contract this muscle for training purposes, you should try to lightly pull your belly button towards your spine and notice some increased tone or stiffness towards the side of your stomach. The third group of muscles that we need to involve in the inner core muscle activation are the spinal stabilizers including the multifidus. These are small muscles that live deep in our back and cross one to three joint segments depending on the fiber. Although small, these muscles play a vital role in segmental stabilization of our spine and are notoriously shut down when pain and or injury is present. These muscles can be a bit more challenging to contract until you get the feeling dialed in. One helpful way to train them and check in on them is to place your fingers on your back, one finger on each side of your spinous process of your low back( the pokey bony prominence that goes all the way down the middle of your spine). This muscle fills the "gutter" on both sides of this bony point. From here, you can imagine you have a string from one gutter to the other (where your fingers are) and you are trying to pull these together. Another cue that can be helpful is if you imagine another string that goes from your low back to your upper back and you are bringing these two points slightly together. These muscles again can be tricky to locate and ensure that you are using them correctly, but you should feel an increase in tone or stiffness underneath your fingers when practicing this exercise. The fourth piece of this inner core puzzle is the diaphragm. This is a large muscle that sits on top of your abdominal cavity horizontally and attaches to your spine as well as your ribs. It is an important muscle for stability as well as respiration and to ensure proper oxygen consumption. To train this muscle, begin by placing one hand on your stomach and the other on your chest. Take in a nice deep breath by breathing into your stomach. You should notice that the hand on your stomach moves outward before the hand on your chest. You can the release this breathe to exhale and notice that your hand on your stomach comes inward back to your starting position. Practice this for a few breathes before removing your hands to ensure you are using your diaphragm when breathing. Now that we have identified and began to train each of the components of our inner core separately, it is time for us to put it all together and make this a functional component of our core stability. Begin this by going through a mental checklist of each of the four muscle groups and the cues to turn on these muscles. Turn on your pelvic floor by holding the flow of urination, your TA by pulling in your belly button, your multifidus by tightening the imaginary string that goes from one side of your spine to the other and your diaphragm by breathing deeply into your belly and making sure your belly rises and falls with each breath. This can seem a bit overwhelming at first, but just like learning any new task, the more you practice the easier it will become. The other important point to mention is when we are using these muscles throughout the day and even with exercise, we don't want to just contract them as hard as we can all the time. Try and turn these muscle groups on at a low grade, about 20% of a total muscle contraction. This will not come automatic to you and will most likely take some refining to adjust down to this place of subtle but steady muscle use and awareness. Practice these for 5 second holds at a time with rounds of 5 repetitions throughout your day. Eventually this will be apart of constant core stability especially during exercise or other lifting tasks.
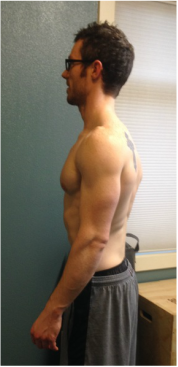
* Disclaimer: Remember to always consult with your physician or physical therapist in regards to starting or changing your exercise routine and in no means is this information meant to diagnose or treat your injury. For full legal disclaimer, see About Me page. Posture is where I would like to start. This is one of the most over-used and under-defined terms that we have in the world of health and fitness. What I mean when I say posture or more specifically good posture or ideal/proper posture is the following. When looking at you from the side, or profile view, I should see… A fairly straight imaginary line starting from your ankle bone, lined up below the middle of your knee joint, which should be just below your hip bone (greater trochanter), this line should dissect through your trunk, through the middle of your shoulder joint and directly through your ear. Looking at this from a visual aspect should look something like this… 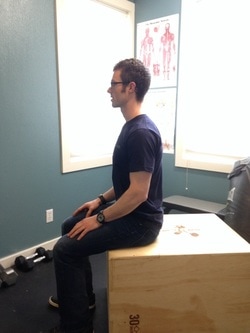 Practicing good sitting posture Practicing good sitting posture Now, how do we get ourselves in this position, which is a practiced skill, not an automatic habit. Whether sitting or standing, we first want to create a little torque from our contact point to the floor. To do this, simply start with your feet about hip width apart, toes pointed straight in front of you. Pretend that your feet are on a piece of paper and your trying to tear that paper in half by externally rotating your feet on the floor. Take notice of the muscles that contract while performing this exercises. Now you simply engage these same muscles in your feet and your glutes and maintain a very light amount of muscle activation, about 20%, to support good posture. From this position, we now engage our core. This should also be done at a 20% contraction level while maintaining breathing. To get your shoulders, spine, shoulder blades, head and neck in a good position, there are 2 cues that I have found to be very effective with the hundreds of people I have worked with over the years. The first is from weight lifting coach Mark Bell, www.markbellpower.com, when he cues his athletes to bench press. One of his first steps is to grip the bar then pretend you are going to snap the bar in half like you were “breaking a stick”. This will create a similar external rotation torque on the bar but for posture will allow us to position our thoracic spine (rib cage area of spine), shoulder and shoulder blades in the correct position. This should then be done at about 20% muscle contraction throughout the day. The fourth and final component of this posture position that we often speak of is the head and neck position that we can realign with a move we call axial extension...
Axial extension is typically done with a combination of lightly reaching the top of your head towards the sky while also lightly tucking your chin back to restore a neutral cervical spine (neck) position. So, why all the fuss over what good posture is and how to get in this ideal position? Poor posture, which can take place in many different shapes and forms contributing to many orthopedic conditions including but not limited to the following. Shoulder impingement, bicep impingement, rotator cuff tendonitis, tendonosis, tears, spinal disorders, slipped disc, disc bulge, spondylolisthesis, retrolisthesis, headaches, muscle imbalances, poor breathing, TMJ, and others, just to name a few. Now that you know what good posture means and how to get yourself there, it’s time to start making this your new habit. Today at work you will probably spend the majority of your 8.7 hour work day* sitting at your desk pouring over work, responding to emails, and managing correspondences with co-workers. As you progress through your day and subsequently through your week, little to no thought is placed on exactly how you are sitting and the position that you are putting your body in. As the New York Times Bestselling Author Daniel Coyle puts in his book The Talent Code, “Practice doesn’t make perfect, it makes permanent.”. Therefore find ways to practice this new skill throughout your day until you can build this into your neurology and make it permanent. Keep this quote in mind when you find yourself struggling to adopt this position and remember that is has probably taken many years of “practice” to teach your body the posture you are currently in, therefore may take some time to unwind this skill. One suggestion that I have found helpful is to reset your posture (feet screwed into the floor, core engaged, break the stick, with head up and chin tucked) each time I check my watch or send/receive a text message from anyone. These built in reminders, or "habit setters" as I like to call them, can help to do just that. Make this posture one of your new healthy habits. * Disclaimer: Remember to always consult with your physician or physical therapist in regards to starting or changing your exercise routine and in no means is this information meant to diagnose or treat your injury. For full legal disclaimer, see About Me page. *average time spent per day working according to 2013 Bureau of Labor and Statistics of Americans age 25-54 www.bls.gov 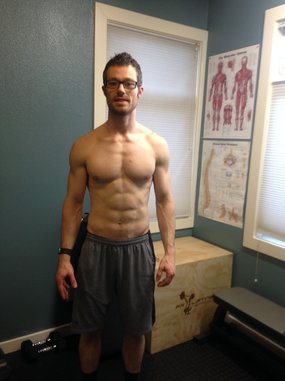 Understanding what your "core" muscles really are and how to use them is extremely important for your physical wellness. Understanding what your "core" muscles really are and how to use them is extremely important for your physical wellness. I have had the opportunity to work in physical therapy in the outpatient setting for over 8 years now and have learned a lot. Some of these lessons came rather quick, such as learning how to capture people’s interest to and convince them that physical therapy can be helpful and healing. Other lessons though, took much more repetitions and pattern recognition over the years to recognize. Now, looking back I can also connect many more dots and see much more clarity with people that I have worked with in the past whose cases I didn’t completely understand. Knowledge combined with repetitive experience leads to improvement. Working in outpatient physical therapy allows me the opportunity to work with all types of different people with many different injuries and stages of recovery from varying backgrounds. One of the amazing things about this work opportunity is that I get to observe common patterns, limitations, injuries, ailments, struggles, etc across many people, over a broad time frame. This has highlighted multiple patterns that are worth being aware of so that you can intervene BEFORE there are symptoms, problems or injuries. The most common injuries are… Although there are traumas and accidents that happen in life that can cause physical injury, this is a very small percentage of the people that end up in physical therapy. These situations are sometimes unavoidable, but I see this patient as the exception, Not the rule. The rule tends to be… Compensations, imbalances and underuse/overuse are mostly the cause or underlying problem when symptoms or injuries arise. I can say with confidence that if we all were to address a few of these common issues that arise from being a human in a modern day environment, than we would see a lot less of these preventable problems and have much more pain free lives. So, what are these common problems that we could address to hedge our bets against future injuries? Posture, core weakness, hip musculature imbalance and poor movement patterns, that’s it. These Four categories cover the vast majority of problems that we see in physical therapy. Almost all injuries that we treat can be funneled into one of these four categories. From your shoulder pain to your neighbors disc bulge, these are oftentimes manifestations of untreated issues that over time can lead to these painful and limiting injuries. If we are first aware of, and then begin to address ways to manage these issues, we can make a big difference in avoiding injuries. So, how do we address these four common issues? Posture: Practice good positions (ie. good posture) throughout the day by checking in with it often. Reset your posture by “breaking the stick” every time you check your phone or take a sip of coffee. And have your environment or workplace set up for ergonomic efficiency. Core Weakness: Make sure you are practicing “core setting” and working on your deep core muscles, NOT your six pack muscles, these are not the same thing. Think Kegals and spinal stabilization. Hip Musculature Imbalance: This can be a problem of muscle weakness, tightness or overall joint imbalance. Most often it is a combination of these things. To help limit or avoid this, practice moving your hips through their available range of motion daily. And take breaks from extended sitting or any stationary position. Poor Movement Patterns: This is simply being able to using your body properly and be able to navigate your environment with good mechanics over time. This can be the silent problem that you don’t realize is a problem, until you have symptoms from this going unaddressed for too long. Awareness of how you are doing things like picking up your clothes off of the floor and bending over to take out the trash make a huge difference over the long term. As I have mentioned in a previous blog post, it is of the upmost importance that we all have a regular movement practice. The great part about this, is that it can take care of all of the above mentioned problems, if structured in the correct way. Read more about this here... * Disclaimer: Remember to always consult with your physician or physical therapist in regards to starting or changing your exercise routine and in no means is this information meant to diagnose or treat your injury. For full legal disclaimer, see About Me page.
|
Author : Jordan ProudfootHere are my thoughts and insights into fitness and wellness to be the best you possible. Archives
February 2019
Categories
All
|


 RSS Feed
